Introduction
This 5.5 meters wide by 9.1 meters long PVC high tunnel is constructed using PVC pipe for hoops. Longer structures, up to 29 m, may be constructed with the addition of hoops. Additional support and purlins may be necessary. A crew of four can easily construct a high tunnel of this design in a single day.
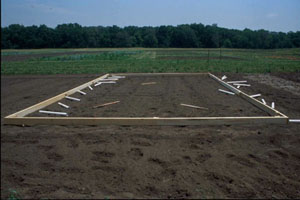
Figure 1. Baseboards laid-out ready for ground post installation.
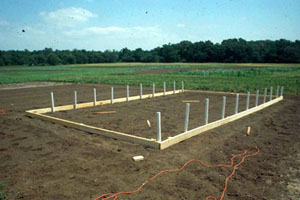
Figure 2. Ground posts ready to be driven in.
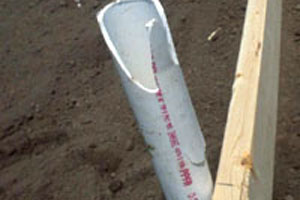
Figure 3. Ground posts damaged during pounding. This can be prevented by pounding on a 2″x4″ rather then directly on the PVC pipe.
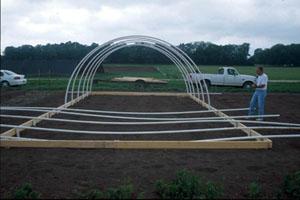
Figure 4. Hoops being placed in ground posts.
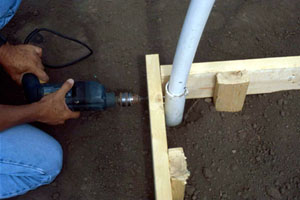
Figure 5. Drilling through baseboard, ground post and hoop. Carriage bolts will hold hoop in place.
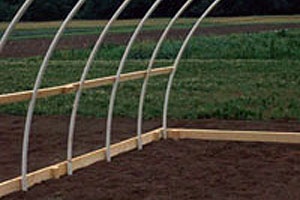
Figure 6. Tunnel with purlin and hip board in place.

Figure 7. Hip board in place
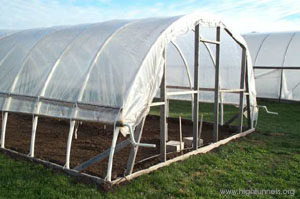
Figure 8. Tunnel showing end wall design at K-State Research and Extension Center, Olathe, Kansas.
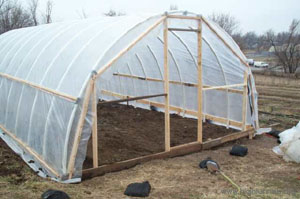
Figure 9. Tunnel showing end wall design at Full Circle Farm, Kansas City, Kansas.
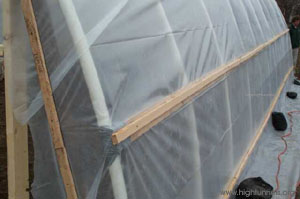
Figure 10. Poly attachment to hip board using one furring strip. This method is less secure than others since poly tends to tear at the screws.
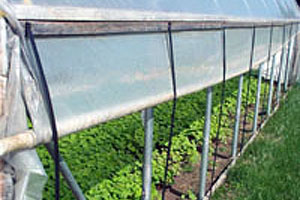
Figure 11. Picture showing the 2-furring strip method of attaching poly to the hip board.
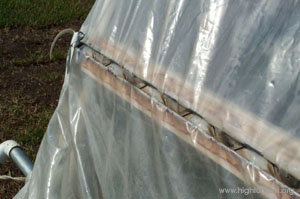
Figure 12. Poly attachment to hip board using wiggle wire.
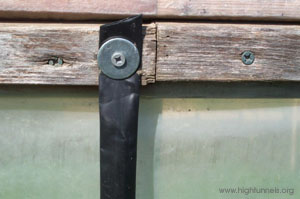
Figure 13. A drip tape strip from hip board to base board at each hoop can keep side walls from billowing.
Materials
| Material | Dimension | Quantity | Notes |
| Twine & Pegs | For corner and baseboard layout. | ||
| Lumber | 5cm x 15.2cm x 3m | 6 | For baseboards. Use rot resistant wood, such as cedar or redwood, if available; or, pressure treated lumber can be used because of possible health concerns |
| 2.5cm x 10.2cm x 3m | 6 | For hip boards. | |
| 5cm x 10.2cm x 2.4cm | 18 | Lumber for attaching baseboards, bracing end hoop, and framing end-walls. | |
| 5cm x 10.2cm x 3m | 4 | Lumber for framing doors. | |
| Furring strips | 2.5cm x 5cm x 3m | 12 | For attaching plastic to hip boards and end-walls. |
| Schedule 40 PVC pipe | 3.8cm x 6.1mbell-end | 12 | For 11 hoops + purlin |
| 3m x 3.8cmstraight-end | 12 | For 11 hoops + purlin. | |
| 3m x 5cm | 8 | For ground posts. Requires 22 0.9m pieces | |
| Primer & Glue | For connecting PVC pipe | ||
| Batten Tape | 150m x 1.9cm | 1 | For securing poly to wood frames |
| Carriage bolts | 11.4cm x 0.64cm | 33 | For attaching hoops and posts to baseboards, and hoops to purlins. |
| Deck screws | 3.8cm | 0.45 Kg | |
| 6.4cm | 0.45 Kg | ||
| 8.9cm | 0.90 Kg | ||
| Greenhouse polyethylene | 9.1m x 10.4m | 1 | For covering the house, use (0.15mm) UV stabilized poly. For the end walls, you may use a lighter gauge material, since it may be taken off each summer to enhance ventilation. |
| Shade cloth | 9.1m x 7.6m | 1 | Ten 38% shade cloth with grommets sewn every 0.9m.. |
Tools
Step ladder
Level and plumb line
Stapler and staples
Sledge hammer for driving baseboard stakes and PVC ground posts
Saw for cutting lumber and PVC
Drill with screwdriver bit.
Site Preparation and Construction
1. Site Preparation.
Choose a good site for locating the tunnel with respect to light, drainage, access, irrigation, etc. Prior to beginning construction you may wish to build a slightly elevated, level pad, or take other measures to ensure that run-off water will not flood the high tunnel, particularly in the winter. Orientation should be perpendicular to prevailing winds if side ventilation is used; and parallel to winds if end vents are used. The ground should be level, side to side, and have no more than a 3% slope end to end.
2. High Tunnel Layout.
Mark the corners of a rectangular area 5.5 m wide by 9.1 m long. Make corners square by ensuring an equal distance between perpendicular corners (should be 10.7 m between outer corners of pegs). Drive 5 cm x 5 cm pegs into the ground at the corners and stretch twine around the outsides of the corner posts where baseboards will run. It is not essential for the tunnel to be level, but this helps to make doors square. To layout a level tunnel, use a level to adjust the height of the string to be used as a guide for baseboard placement. If built on slight slopes, the baseboards should follow the slope, and hip boards should be parallel to the baseboards.
3. Set Baseboards.
Cut 14 0.6 m pieces of 5cm x 10.2cm board, and cut points on ends for driving into the ground. Drive in these stakes for baseboard attachment on the inside ofthe guide string, orienting the broad side of the 5 cm x 10.2 cm board parallel to the string. For the long sides of the tunnel, posts should be 3 m from each end (where the baseboards will meet) and 15.2 cm from the ends (to allow space for PVC ground posts). Attach the 5 cm x 15.2 cm x 3 m side baseboards to the pegs using 8.9 cm screws, starting at one end (snug with the corner peg). For the end walls, place a peg 3m from the outer edge of one of the sideboards, and 15.2 cm from each of the corners. Attach the first 5 cm x 15.2 cm x 3 m (snug against the end of the sidewall baseboard) and cut the second one to fit.
4. Drive in Ground Posts.
Mark inside of side baseboards at 0.91 m spacing starting from the end of the sidewall baseboard. Remove corner pegs and string and drive in PVC ground posts at corners and at 0.91 m marks. Posts should go in roughly to the top of the baseboard, at most. It is possible to damage the PVC by hitting it too hard with the sledgehammer, or trying to force it through tight or stony soil. To avoid damaging PVC with the sledgehammer, have a helper hold a length of 5 cm x 10.2 cm board over the end of the pipe, and pound on the board. As an alternative to PVC ground posts, metal reinforcing rod (rebar) can be used. Rebar dimensions are: 1.3 cm x 45.7 cm, with 30.5 cm in the ground and 15.2 cm above ground.
5. Hoop Assembly.
Assemble 9.1 m hoops and purlin by gluing together 3m and 6.1m PVC pipes. Use PVC primer and glue, following instructions for correct use of products.
6. Raising Hoops.
Erect hoops by inserting one end into a 5 cm PVC ground post, and bending the hoop to insert into the ground post opposite on the other side of the tunnel. Make sure that ends of hoops extend well into the ground posts (at least 30 cm). After inserting the posts, make minor adjustments in the height of the hoops (sight along the top of the hoops from a ladder) so that all are at the same height. Drill through baseboard and pipes with 0.6 cm wooden drill bit. Attach using carriage bolts, washers and nuts, pushing the bolt through from the outside, and tightening the hoops snug to the baseboard
7. Purlin Attachment.
Attach purlin (9.1 m 3.8 m PVC pipe) to the inside of the hoops. Drill through purlin and hoops at 0.91 m spacing, and attach using carriage bolts, washers and nuts. Head of the bolt should be up to present a smooth surface to the poly that will cover the tunnel. Add a piece of duct tape over the top of the carriage bolt before putting the poly on the hoops.
8. Hip Board Attachment.
Attach hip boards at 0.91m height using 3.8 cm screws. Mark hoops 0.91 m above baseboard, and attach 2.5 cm x 10.2 cm x 3 m end to end, starting at one end of the tunnel. Ends of hip boards may be secured together where they meet by screwing a block of wood across the inside of the junction.
9. End wall Construction.
The most critical components of tunnel greenhouses are the end walls. Use 5cm x 10.2cm lumber to frame in end walls. There is no hard and fast rule for end wall design. However the picture below shows the general design consisting of four uprights reinforced by horizontal and diagonal bracing. Spacing door uprights at a standard distance (81.3 cm, 86.4 cm, and 91.4 cm) accommodates standard door sizes. Cut notches in the uprights to fit the inside of the baseboard or the hoop, and attach using 6.4cm or 8.9cm screws. If longer lasting end walls are desired, they can be covered with corrugated fiberglass instead of polyethylene.
10. End wall Bracing.
Attach end wall bracing. Cut 5cm x 10.2 cm lumber to run from baseboard close to the second hoop, and attach to end wall and baseboard.
11. Plastic Preparation.
Attach furring strips end to end along the upper half to the hip boards. Alternatively attach the channel for wiggle wire using self tapping screws. Note that PVC will react with the polyethylene greenhouse covering, so in order to attain the expected 4-year lifespan of the plastic, measures should be taken to prevent contact between the PVC and the polyethylene covering. This may be done by painting or taping the side of the PVC hoops that will be in contact with the plastic.
12. Plastic Attachment.
It is best to do this on a calm day. Lay out the poly lengthwise on one side of the high tunnel. If you are cutting from a longer roll of plastic, be sure to leave 0.6 m extra on each end to allow for attaching to the end walls. Pull plastic over the tunnel. A simple way to do this is to secure a rope close to the edge of the poly at each end of the tunnel by placing an object such as a tennis ball under the plastic and tying the rope around it through the plastic. Then the rope is thrown over the tunnel and the plastic pulled over the tunnel using the rope. Make sure the plastic is well centered on the tunnel and then attach by placing furring strips over the plastic, snug against and just below the furring strips already attached to the hip board. Attach the furring strips with 3.8 cm screws, placed every 0.6 m or 0.91 m. Pull the plastic tight and attach to the other side in the same way. Finish securing the plastic by attaching to the end walls using additional furring strips.
13. Stabilize Sidewalls.
Prevent sidewalls from billowing. To prevent sidewalls from flapping in the breeze, some sort of support is needed to keep them in check. Pieces of used drip tape running from the hip board to the baseboard at each hoop are effective. Using a fender washer along with the screw prevents screws from tearing though the drip tape in high
winds
14. Install plastic on the end walls.
If planning to take off the end wall plastic during the summer months, we use a lower thickness end wall plastic. Either commercially available poly tack strip or furring strips may be used to secure a sheet of plastic completely over the end wall. Then a hole may be cut for the doorway. For more permanent end walls, fiberglass may be used.
15. Frame Door.
You can make a door, or use an old foor on one or both ends of the tunnel.
16. Shade Cloth Installation.
Shade cloth helps keep temperature down during the summer in high tunnels. Grommets sewn into the cloth every 0.9 m allow for tying down to eye hooks fixed into the baseboards.
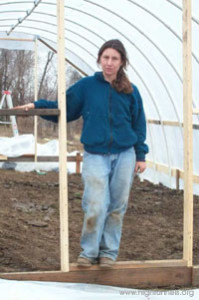
Katherine Kelly in her newly constructed hoop house.
About the Authors
Robbins and Jim Hail own and operate Bear Creek Farm in Osceola, Missouri.
Katherine Kelly owns and operates Full Circle Farm in Kansas City, Kansas
Ted Carey, is Extension Specialist Food Crops, Kansas State Research and Extension Center Olathe, Kansas.
Gary W. Hickman is a Horticultural Consultant for US-AID projects. For more information, see www.cuestaroble.com.


